Pages

Thursday, October 25, 2012

Falling into Fall

Fall is here, yay! I love love fall and I love decorating for fall, but we like to keep the spending for seasonal decorations on the low side. So for our front porch I gave myself a $10 spending limit and was even able to stay under budget. We went to the store and picked up a small pumpkin, some corn, and some cute squashes. The sit perfectly with our lanterns that we are reusing from our wedding decorations that we picked up from Pier1 on sale (and using my BFF's discount, holla!). 


The other potted plants came from mom and nana and are filled with perennials and succulents. Oh and in the very back pot we have a dollar store scarecrow find.


Since I came in under budget for the outdoor decorations I picked up this cute wooden sign from Gordman's for 4.99. 


And this cute glass star for 2.99 that I think would work for long term decorations and stand out for fall (with the bronze color) and for christmas (with its star shape). Also how cute are those lion head book ends? I snagged those up from my mom's garage sale pile. I see spray painting plans in their futures. 


Then over on the end table we have a too cute cable knit sweater vase from Target along with an orange glass LED flicker candle that we are reusing from the wedding decorations. And how cute is that "BOO" sign that I picked up from Gordman's for 1.99? The sign and the vase sit on top of some log slices that we used at the wedding that I got from Michael's a while ago.


Over in the fireplace corner we have a cream hurricane that was a housewarming gift along with the W we used for our photo booth at the wedding along with a small log that we used in wedding decorations that I got from my BFF. She used this log and a handful of others for decorations at her mom's 50th birthday party.


On the other end we have another orange flicker candle and another lantern hanging out with it.


So there we have it. Fall. In the house. Yay. Oh and you better believe I have me some pumpkin spice candles burning like 24/7. Well the meltaway ones, they are safer.

Wednesday, October 17, 2012

Countertop Remix: The Finale

Side notes: kitchens are hard to photograph and it took me forever to come up with a title for this post because this is not the kitchen finale, just the countertop finale. We still have big, big plans guys. You can catch up on our Countertop Remixes here and here. Basically we found some old doors at a Habitat for Humanity and made them into counters. 

Any-who, this is what our kitchen looks like today. This is the view from the nook/mudroom/bar area. We have a nice seven-ish foot peninsula where we have breakfast and usually eat dinner when it's just the hubby and I. 


We got these awesome barstools from Overstock.com from B's parents for our wedding shower. They are awesome. I like how they bring a tiny industrial look to our walnut and white kitchen. 


This is the far end of the peninsula where Sir Mix-a-lot my kitchen aid mixer lives as well as Ed's treats, a bowl for fruit and a clearance vase from Target that I stuffed with succulents we had left over from the wedding.


Here's a sexy shot of the edge of the counters. Even though the doors were 'solid' oak this only meant about 1/8 of an inch in, after that you will find particle board. So we picked up some stainable veneer iron on edging and doesn't that stuff look freaking fabulous?


This shows the joined efforts of B and my dad trying to work around that pesky column you see on the left corner. You see, this kitchen used to closed in where the peninsula now is, so this column is weight bearing like major. The old counters went around the column but a lot further then we wanted our wooden doors to stick out so we were left with this weird gap in between the column and what we wanted as our edge so the veneer edging wasn't an option because it bent in to where the gap was and looked icky (sorry for that major run-on sentence). So the guys finally thought, hey let's just cut off an edge of a door and nail it in all rustic-like and this was the result. Rusticly beautiful. 


So moving over to the sink side we have our espresso/coffee station that sits on this amazing cutting board that we got as a wedding gift from my aunt in Colorado. We love it so much we want it out so we can see it but not where we can use it so it won't get scratched. We're silly. 


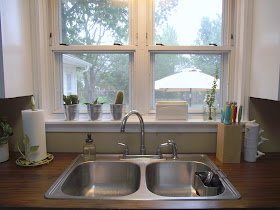
Coming around then is the view above the sink where we have some Ikea cacti hanging out as well as some napkins resting in a cute ceramic holder I found while thrifting in Kansas City. 


Here's a close up of our awesome knife set we got as wedding gift, they are Martha Stewart from Macy's. Next to that we have some too cute measuring cups from Pier1 that we got from one of my besties.


Too cool for school, amiright?


Then we made our cabinets nakey! B has this bad habit of leaving cabinet doors open because he "doesn't like the sound when they close" so I get to walk into the kitchen with our doors wide open. So I said, ok fine the doors are coming off. But for reals, we love it. It makes loading the dishwasher a breeze and I get to check out a good chunk of our wedding presents while eating breakfast. I do have to dust my bowls now...only downfall. 


I get to look at my wavy Pier1 serving bowl and are neato square plates from Macy's. Oh and we went with all white dishes because they are classic and super versatile. Want some color? Just add a teal bread bowl. 


Like this one from Macy's!


And yes I put artwork in my cabinets to spice them up. This sweet little frame was a gift from my aunt and goes well with the bicycle theme we had at our wedding. Also that cute little toothpick holder is from the Dolla Store, holla.


And yes those are strangers in the frame. Surprised? And this cute cake stand was a wedding gift from Macy's. Well, the cake stand is from there, we were not given a wedding gift from Macy's. And of course I topped it with left over succulents from the wedding. And by left over I mean I yanked them from wedding arrangements that we have sitting in the guest room.


And how cute is this little guy? I got this from Nana for my birthday and it is originally from Macy's. It's a nice shade of grey and pops a little against the white dishes.


So that's where we are with the kitchen. Obvi much more needs to be done but we will get there. Slow and steady wins the race.

Tuesday, October 16, 2012

Painting Big Ben

Lately our fireplace has been making our long skinny living room seem like a dungen on the far end. We have crisp white crown molding and base boards, window frames, ceilings and bookcases that all work well with our dark walnut floors and shades. However, our hodgepodge of dark red and brown floor to ceiling brick fireplace wasn't working with our crisp white clean style. Here are some shots to remind you what we were working with before I got my hands on that porous surface. Oh, and I forget, but we took the fireplace screen off and we like it without, once we need something there to protect I think we'll just go with a screen from Target or something that just rests against it. 


Obviously those burgundy chairs weren't helping lighten anything up, but I have plans for those guys too, no worries.


So finally, after months of convincing Bryan, and only after we got loads of Lowe's giftcards for our birthdays, I picked up the necessary supplies to turn our dungen corner to a light bright white space. All I needed was a gallon of latex Ultra White flat interior paint (we went with zero VOC), a masonry roller and a 1.5" brush to get into the grout grooves. 


Here's Big Ben (yes, I have named our fireplace) after a rolled on coat up top and some grout coverage down on the bottom. Let me tell you, grout painting is not for the weak of wrist. That grout is so porous it's not even funny and it took about 3 gloppy coats to get a good white shade. 


But here he is all painted and clean! He took about 15 hours and the help of a couple people to complete, but I am so so happy with the results. 


Look how lovely he looks next to the baseboards and the edge of the window frame and I love how he pops against the wood floors now instead of sinking in and hiding.


Up close and personal with Big Ben. 


I did not paint the inside of the fireplace because I like keeping it dark and I didn't really want to go through the messy process of cleaning that out. I did do the edge of the bricks that go into the inside just to get a nice clean edge. 


Then the fun part, I got to run around the house and try to dress up Ben with some left over wedding accessories. This is the frame and W we used for our little photo booth area at our reception. The blue vase was a shower gift. 


I finally settled on this arrangement - the W, an empty green frame from wedding, a cream hurricane from a housewarming gift, an 8x10 frame from a shower gift on the left side and a 12x12 frame filled with scrapbook paper that I picked up from Old Time Pottery about 5 years ago and the same blue vase from above. 


Here is a side shot of Ben hanging out with our bookshelf....super. cute. I want to add a nice dark chunky wood mantle soon so we can hang stockings and add maybe a mirror on top to open up the space. But for now I'm just enjoying the new bright space and for around 35 bucks, I think we made a big change.


Tuesday, October 9, 2012

Heart Shapes & Boxes

As we all learned from this post I am no stranger to hanging pictures of strangers on my walls so this is what our entryway has been looking like for a while. I will come up with an idea for a project and find the perfect frame or shadow box then let it hang on the wall for months until B is like, "ok, for real". 


Here is a shadow box my mom picked up for us at Ross, it's a wooden box with a cool scroll design on top and dotted frame around the glass that houses a tan cushion - it even came with pearl topped pins. 


I picked up a ton of 4x6 and 5x7 white frames from Target a while back when they were clustered for 4.99 or 5.99 for a pack of 4. The left has a shot from our engagement pictures and the right has a piece of teal/gray scrapbook paper that has all these frames on them with some words, this one says "happy". The 9 I found at River City Trading Post in Jenks for 1.99 - it has now became 'our number' since it's our wedding month.


This is the floating frame I picked up specifically for a project months ago, it came from Michael's for under ten bucks. I saw a cute idea on Pinterest to cut out heart shapes from a map of significant places and float them in a frame. 


I picked this Road Atlas up from Target for 7.99. 


Then I tore out the pages I needed - Missouri, Oklahoma, Mexico - where we met, where we married, where we honeymooned.


Then I took off one of the pictures of the strangers and folded it in half and did what I know best on how to make a symmetrical heart ala junior high days. 


So now I have a heart shaped stranger instead of a 3x4 inch stranger. 


Then I placed my heart over the area of my map I wanted to cut out and got my places all together and plopped them in the frame with a piece of dot tape. Then I put the little guy back where I've had him hanging for months. 


Next came the shadow box guy - here is a little better shot of his color and detail, super cute, eh?


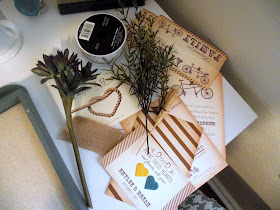
I wanted to put a shadowbox of wedding day memorabilia in here so I gathered up all the small wedding stuff we still have scattered about the house. I sorted through our Save The Date, Invitation, Reserved Seating cards, the Wedding Program, our Wedding Favors, a scrap of burlap and lace, a twig of wheat and greenery and a small succulent. 


And here's is what we ended up with - the Save the Date, Invitation and wedding favor all made it in as well as the floral samples and the fabric samples.


Here is a closer shot of those precious precious memories. I like having this here because I loved loved all of our wedding announcement things and keeping a small sample of the floral and fabric gives a nice look see into the feel of our wedding for us as the years go by and we forget the entire day. 


So here is the entryway wall again with the shadow box and hearts framed - we are now down to one(!) stranger framed here...there are still a couple scattered throughout the rest of the house.


Oh and here is what we have going on, on top of the 'shoe bin' that pops made here - this post also gives you a peak at how the entryway started. These little guys are a cute succulent set I picked up from Pier1 for under 6 bucks. You know I love me some succulents and I think this are just too presh. 


This is a tray and cute woven candle I snagged from the clearance shelf at Target for under 2 dollars. The other candle is a BBW candle (hello, fall scents), but this tray is great because it holds our keys and as long as B remembers to put his keys here in the first place, he never forgets where they are. 


Thursday, October 4, 2012

Office Space

Living in this house is the first time we've had a space over 700 square feet and with this extra space comes designated rooms that we'd like to use to their full potential. Since right when we moved in we were in the middle of planning our wedding the office space became a place for odds and ends that started collecting and piling up. 

Our goal was to create two separate office spaces with two desks and tons of organization - in one room. One place to pay bills and organize importnat life things and another space to create things and keep all my craft stuff in order. We lucked out and scored a basic white desk from my aunt that I would use for my craft corner and then my family found an old roll top desk for us at an estate sale. It's solid wood, and heavy and long and has lots of storage space - perfect for B.

First we made a pit stop to Staples to check out the Martha Stewart office organization stuff. Let me tell you, I could buy up every label tag, drawer, box contraption that had her name on it - her stuff is to cool for school. So we picked up basically what you see in the pic below; one pull out drawer, one filing shelf and some small compartment pieces with lids.


We also got some of these neat folders that hang on the wall to help me keep coupons and sort through things I need to deal with. Now her stuff isn't exactly cheap, but it's pretty sturdy and we won't be moving these things around much so we are hoping they will last awhile. 


In a trip to Ikea in Dallas over the summer I also picked up some basic craft photo boxes and a white board shelf with two brackets. I wanted the shelf above the desk to be able to hold some photo boxes and maybe a picture or two in order to keep the top of my space clear. See how messy it already is? 


It got better! I moved some things around, hung the shelf (well, B did) and added some lighting. 


See underneath there? I put a small trash can, my craft paper storage cube with the Martha filing system on top of it. 


These were also from Staples, but not Martha, they were $4.99 for the set of 4 and they just had sticky backs that I peeled off and placed on the wall. It says they are removable to we will see! I'm planning on pinning coupons (so I don't forget to use them!) and color samples and ideas as I find them for inspiration. 


This is what I put in the corner; it's a stack of old books I bought for less then $1 at River City Trading Post in Jenks, OK with a framed copy of our wedding favor sitting on top. The favor says "Plant these hearts and flowers with grow" - attached are two biodegradable hearts filled with wildflower seeds. Next to the books is a cute .99 cent holder for my thumbtacks. 


Here is the Ikea shelf and brackets I picked up this summer all for under $10. The photo box is also from Ikea, it came in a two pack for $2.99 and the filer folder is Martha. 


Yes, this is the tip of a giant pencil. For some reason I am obsessed with everyday objects that are either obscenely big or super tiny. I picked that one up at Hobby Lobby on clearance for $2.99...apparently not many people share this same love for oddly scaled objects. The black "E" is something I've had around for a while and is also from Hob Lob - maybe $2.99? The framed art is actually a card we got for our wedding from some family friends of B's - it's handmade!


This is the metal cart that sits to the left of the desk and it holds the printer and some more photo boxes and a craft cube thing. 


 We scored this metal cart for free from one of my aunts, sweet, huh! It also does a nice job of keeping our router and icky cord mess hidden, I just shoved the power strip underneath the cart and no more cords! 


So that's my half of the office - B's side is still in progress - maybe some hardware changes and placement of all the 'junk' that accumulates. Oh, and ha, I still need a chair. Currently we are sharing one. It doesn't work out well, as you can imagine.