Monday, June 25, 2012

Mr. & Mrs.

As you might be able to tell by our various postings that I tend to pile quite a bit of projects on my plate. Currently we have about 3 or 4 house projects that are all about 90% complete. Well, I tend to forget that there's this huge project coming up in a couple months...our wedding. I also forget that in order to have a beautiful - but - in - our - budget - wedding I've opted to DIY a ton of things to make the ceremony/reception/photo shoots super cute and personable. So I thought I would share them with you guys as we go along - they aren't necessarily house projects, but DIY nonetheless and I do hope to reuse a lot of the things we make (center pieces, favors, decorations, etc) in our own home after the wedding. 

So this weekend B and I drove up to Kansas City for a wedding and we thought we could squeeze in an engagement photo shoot as well. My cousin Amy is a wonderful photographer that has started her own little business that you can check out here & here. I wanted to use her as our photog because we don't like the typical engagement type photo sessions that we've seen done before. Amy's style is more focused on the architecture and 'scene' of the photo which we like because we are super awkward when the photo is just on us. Anyways, I'm really happy we went with her and I can't wait to see the finished project in two weeks. Before the photo shoot B's sister and I got our craft on and picked up a couple of things to use as props. We brought our Antropologie mugs that have our initials on them and we picked up this & sign from Hobby Lobby for 9.99. 


While at Hobby Lobby we saw this cute burlap banner that included 6 panels for 5.99. We thought it would be cute to paint Mr. & Mrs. on it and hold it up in a couple of photos. 


While there we grabbed this paint in Turquoise for 3.99. It's all non-toxic and stuff. 


The stencils we got included every letter of the alphabet plus some symbols (we needed the kit to have an ampersand (&) because the banner only had 6 panels so we couldn't spell out 'and'. This stencil kit was 5.99 and had all the letters and symbols individually which is nice. So I punched out the letters I needed and tested it on some cardboard first.


I used a small makeup applicator sponge to apply the paint. I knew if I didn't tape the stencil down that some paint would seep around the edges and make the lines less straight but I was totally ok with this. I wanted this to be a quick 5 minute project not an hour ordeal so I wasn't too concerned with perfectly straight letters. 


After testing one letter I was happy with how it turned out so I started in on the burlap. I simply laid the stencil over the burlap panel and dabbed my sponge in the paint then applied the sponge on the stencil. The burlap soaked up the paint really well so I didn't need much to get good coverage. 


With the '.' at the end of the R. and S. I just used the corner of a brush. Again I wasn't concerned with it being perfectly round or anything so I just kind of dipped and dabbed. 


Also we noticed in the packet for the panel it included metal rings to use for the end pieces but I guess we weren't thinking about what was going to hold all the ones in between together. So Mal dug around and found some teal ribbon that we ran through the rings of the panels and tied off on the ends. I will probably switch this out for twine when we use it for the wedding to make it a little more rustic. 


And luckily for you Mal snapped this sneak peak picture with us and our banner from the photo shoot we had on Saturday. This is from the Kaufmann Legacy Gardens near the Plaza in Kansas City. This place is amazingly beautiful and free. It's very Alice in Wonderland style. 


So expect to see a little more wedding-esque projects being posted here for the next couple months, 68 days to go. Crazy. Also please excuse my snarky face. I'm sure I was just trying to find a balance between serious and yet still smiling...this is why we don't take professional pictures. They won't all look like this I hope promise. 


Monday, June 18, 2012

We've Been Framed

The entryway is finished! Hahaha, just kidding. It's kind of sort of just getting started. You see, I have wall collage envy from other blogs around the internet world so it's inspired me to do a little something extra special cool for our entryway. I've been collecting frames for a while now and I recently took them all and spray painted them white. Some were from the dollar store, some were bought as a box set, and some were found at Old Time Pottery (which is no longer in business, sad face). The only ones I didn't spray paint white I left the taupe color that I painted them last year. So currently we are working with 6 white frames of various widths, one white collage style frame, one distressed white message frame, four large taupe square frames, two silver blocks (a W and a 9), a large teal W and a large mirror. Anyways, here is what we were working with before the lamp and mirror got a paint job and the lamp got two new shades.


I picked up this shade from Target for $7.99. I like the light it casts out and it has a small wave pattern that's cute. But...


...it was too wide for our skinny shoe bin. It touched that wall even when it was pushed to the very edge of the table top...not cool. So...


...I traded it in for this one, which was $5.99. It's white, but doesn't have any pattern to it, but is a nice small rectangle shape. And it can sit in the center of the table top and not touch the wall, yay! Oh and surprise, I spray painted the lamp base white, more on that here!


Then this is what we were working with. Surprise, I spray painted the mirror Avocado! More on that here. I didn't like how spaced out the pieces were, knowing I want to add things as I get rich find them I wanted to have the space to do so. Besides I didn't want it to look like I was actually trying to fill in the space with only 4 items. Also that stand on the floor to the left got moved to the right to help block the outlet/cord situation. 


Isn't it lovely? It's an old conveyer belt gadget that I found while treasure hunting with my aunt. I stuck some stems in it that we had on hand and called it good. 


Here are the metal pieces I was talking about earlier. I got the W for the last name this house will have come September, which is the month we're getting married in, which is the ninth month, hence the number 9 that I picked up to go along with it. 


Here is a close up of the large frame that was once wooden. I picked up four of these about five years ago in Old Time Pottery (can't remember the price, but they were on a sophomore college student budget, so they couldn't have been much). This is the second life they've had because I just change out the paper in the center to get a different look (it's just 12X12 scrapbook paper). So for a jar of sample paint (yes I was cheap) and 4 new scrapbook pages for .25 cents I get a whole new look. 


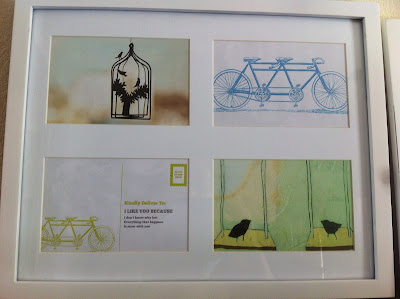
Here's one of the frames that came in a box set. I might have gotten these from Old Time Pottery as well, but I honestly can't remember. I've had these since sophomore year as well so again, they were probably cheap. I went online and found images that the artist allowed to be printed as long as I wasn't selling them. I think they're kinda cute. 


This is a neat little message board that my aunt gave me. It's cool because it's so versatile. You can hang it either by the ribbon using the knob it gave or by the sawtooth on the back. You can use the scrapbook paper as a background (it came with 4 reversible sheets), you can add stickers from the themes it came with (wedding, graduation, rustic, bright). It also has four little magnets and two tiny clothespins that you can hang something off the ribbon that runs across it. 


So do we want the background that matches nicely with the background of our musical note bird print?  This print was also from that same artist's website that lets you use her prints for non-commissional purposes. 


Or whimsy old school notebook style background? Who knows. I'd say it'll get changed about once a year.


This is a really cool piece. Nana picked it up for us at Hobby Lobby. She bought it full price at $25.99 because they only had one W left, but they are running 50% off their metal wall art this week, so she can take it in a get half back, which is nice.


Doesn't it look great in the middle of the avocado mirror and the blue green striping of the scrapbook background? 


One more close up. Then I'm done. 


But I guess the moral of this story is that you can't have enough frames? Because we tried for a while to find a layout that we liked while working with what we have but it just can't happen. I'll be making an Ikea trip in August so I'm going to pick up some inexpensive white frames there to add to this collage. There are a couple of Pinterest projects that I'm waiting to do until after the wedding that will be some filler for the wall as well. So needless to say it's a work in progress and this is what it looked like yesterday afternoon when we decided to be 'done'. So more to come I guess!


Entryway Prep

This is just a real quick post on how we spray painted the lamp and mirror that are in the entryway. I didn't get all the necessary 'after pictures' before we assembled and put them up because I wanted the entryway to be a surprise, but here's how we got to here. First I picked up a can of Valspar primer and a can of Valspar white in gloss. I also picked up a can of Valspar in Avocado for the mirror, I guess I was just too into keeping it a secret because I didn't even take a picture of it. 


So first I took the lamp shade off and took it out back on my spray painting stand (just a chunk of our old counter sitting on a plastic tub). Then I taped off the power cord so it wouldn't get all gunky with spray paint.


Then I taped off the space where the bulb screws in. Something tells me that a hot bulb being powered mixed with spray paint gunk just doesn't go well, so I decided to take care of any potential fire hazards.  Then I gave the lamp about three light coats of primer. I find that doing multiple light coats helps avoid nasty drips and weird thick spots. You only have to wait 5 minutes in between coats so it's really no biggie. Then I let that sit for about 45 minutes before I gave it multiple thin coats of the glossy white. I really like the Valspar cans because the spray is at any angle which lets you get up underneath spaces and real tight in the design on the side. I let the lamp sit outside for about an hour before I brought it in to the house to cure overnight before putting it on the shoe bin. 


While the lamp was drying I started prepping the mirror for paint. I used painter's tape around the edge so I wouldn't spray any paint on the mirror. 


Then I gathered some old paper and laid it out over the mirror and taped down all the edges to seal any potential windy spray paint from getting in. You don't want to have to scrape paint off of a mirror so trust me when I tell you to take the extra time to seal off any and all edges. 


Then it was primer time. Again I did about 3 thin coats of primer before applying the coat of Avocado. I did 3 coats of Avocado before letting it sun dry for about an hour before bringing it in to cure overnight. I was able to hang it about 12 hours after it was spray painted with no problems. The lamp and mirror felt tacky for about 2 days but they weren't sticking to anything. By now (about 8 days) they have cured up really nicely and are nice and smooth and hard to the touch. 


Sorry for the backwards posting but that entryway looks pretty snazzy eh?

Here are some updated pictures of the finished projects. Doesn't that lamp just look so crispy clean now?


Check out all that detail. Love it. I hope my cousin's wife doesn't realize she wants them back now!


And here's about the only good shot of a mirror I could get without capture my lovely mug. This photo does that color good justice though. And good news, B loves it too! 


Thursday, June 14, 2012

Rolling Down the River...Stone

So I told you about the shoe bin that Pops made for us, right? Well since he left it blank we were able to decided on a color/stain that we talked about here. We initially decided on Charcoal Gray but once we got to Lowe's and saw the stained wood samples in person we decided to go a different route. B actually ended up picking this color, it's Riverstone, and is a nice blueish-gray. We aren't normally 'color' people so this was a big step for us, but we love it. 

Here are the basic supplies we needed. We picked up a can of the water based colored stain and a can of water based Polycrylic in satin (we still don't like shiny) to seal it. 


We used a brush that we had on hand and old t-shirts to wipe off the stain. Here are the legs that we picked up at Lowe's for $1.50 each. These will screw into a metal piece that we will attach to the underside of the shoe bin.


Since we were being brave and picking a crazy color I wanted to test it on the inside of the bin first before we committed to the entire piece. Luckily, we both loved it and I kept moving forward with Riverstone. 


Here's a better angle to try and see the shade of blue gray it creates.


Ta-da! Here's the entire bin stained, what do you think? We like it a lot. I left the stain on for only about a minute or less before I went to wipe it off. We wanted to see a lot of the grain still and we like how it looks almost nautical. 


I went a little OCD and stained most of the backside as well. When you open the bins up you can see back into the piece a little and I didn't want it to look unfinished. 


And here's the piece up in the entryway. I really really like how it pops against our dark walnut floors and with the white frames. The lamp will get an up-do here soon and we'll be adding more pieces to the wall as we get them. We let the stain dry for four hours before we put one coat of Poly on it. I decided on only one coat, mainly because I'm impatient, but it also won't be going anywhere anytime soon since it's anchored into the wall, so I think it will be just fine. 


Look at all that space for shoes! I'm so excited to get the shoe clutter off the floor. 


 Check out that beautiful wood grain...lovely.


Then it was time to put on the legs and anchor it into the wall. Here is the metal piece that we screwed into the front corner of the bin. 


Here it is with the leg piece screwed in. We added two legs to the front end to give it a polished, furniture look to it. The entire piece is anchored in across the back with two long screws going into the wall so it's really not going anywhere. Before we anchored it into the wall we put the knobs in place so we would be able to open the drawers. So that's why this is the last photo because I want to save the entire piece (knobs, lamp, new wall accessories) for last. So you'll have to wait until Monday! 


Tuesday, June 12, 2012

Grande Knock Out Rose With a Shot of Nitrogen

Hey guys! Just a quick thing that I found super duper exciting today! Did you know that coffee grounds are great for your soil and gardens because they are rich in nitrogen, an essential nutrient for plant growth? And that it keeps away ants, slugs, snails and cats? Did you know that if not used for aiding in soil growth they would be sent to a landfill? Well, did you also know that Starbucks bags up their coffee grounds and saves them for customers daily for free? I didn't, until today!

I walked into my local Starbucks to grab my daily fix and saw a bin on the floor full of large grounds of coffee and I was like, "hmm...that's weird." Until the words "free" on the side really caught my eye. I looked closer and saw the label read that these were meant to be used for you garden and soil and is super eco-friendly. So I double checked and lugged one up to the counter and said, "for real, is this free?" And sure enough there were going to let me lug away this big ole bag out of the store to use as free plant bed nutrients. So I did, thanks Starbucks! The guy at the counter told me that if they don't have some sitting out next time I'm in I can always ask them to start saving some just for me and I can just stop in and ask for my bag. How sweet!

Though I'd share this knowledge I came across today and maybe your local Starbucks or coffee shop has something like this they can offer for you!


Mr. Clean

Remember when we went all eco-friendly on our cleaning supplies back in this post? Well I wanted to share a small update on how the bathroom cleaner is working out for us. We bought Meyer's Clean Day Bathroom Cleaner in Lavender. I was a little apprehensive about it because it boasts on the bottle how it has a 'non-harsh' 'all natural' formula and since I've only used products that usually contain bleach or other harsh chemicals I was worried that it wouldn't get the job done. 


So I let our bathroom sink get a little grody and junked up with toothpaste and soap rings. Isn't it lovely? Then I took our all natural, smell good, earth friendly cleaner to the test. I sprayed the cleaner directly in the sink and on the faucet and underneath the soap dispenser. I left it sit on there for about as long as it took to set the cleaner down and grab my damp washcloth then I started wipping it off. I used normal pressure just to test it's strength and let me tell you, it did great! 


See how shiny and sparkly it looks now? It got all of the toothpaste chunks off as well as built up soap residue on the faucet and the soap ring our dispenser leaves underneath itself. I didn't have to put any extra elbow grease into cleaning which is nice. And the smell? It's great, it's like a soft lavender scent, not too strong but you can still get a whiff. It didn't burn my nose or eyes like most cleaners and it didn't dry out my hands all funky like harsher cleaners do. Bonus!


We've been sticking with the vinegar + water combo to clean our kitchen and dining room table, but I think I will try to find a Meyer's all-purpose in Lavender just because lavender smells better than vinegar, you know? Here's where you can buy a two pack of the lavender all purpose cleaner refills, just provide your own spray bottle and you're good to go. 


I've also done some research on reusable swiffer cloths because with hardwoods I've been having to swiffer three or four times a week so we go through them pretty quickly. I found these on Amazon. I'm thinking about ordering one or two here pretty soon when we run out of the swiffer cloths we have now. It says it's machine washable so I figure it will be nice to have one on backup if the other is still drying. Happy green cleaning! 


Monday, June 11, 2012

The Rug Doctor

Since we all know that I would do anything for our furbaby Ed, then you should know off the bat that this post is only happening because of him. You see B and I have dealt with 'apartment style carpet' for about the last 5 years from living in various places while in college. By 'apartment style carpet' I mean the cheapest, thinest, smelliest, dirtiest, most unsanitary carpet ever of all time. So you can say that I have grown a tad bit of a fear of carpet. I don't like any of it. I can only imagine what things are in there and I know how dirty it can get in a short amount of time. So needless to say one of the things at the tip top of our priority list when house hunting were hardwood floors and zero carpet. Well our house has most of what we wanted since it only has carpet in the master bedroom (which will be taken care of at some point) and hardwoods everywhere else. 

But now back to why this post is about Ed...now imagine our little furbaby who loves to cuddle on the couch with us while we catch up with shows on Hulu trying to get traction on the hardwood in order to jump up on to the couch. I'll give you a hint: it doesn't happen. Instead he picks the best part of the show to decide he wants up there with us and barks and barks at us until I reach down and pick him up.  What kind of mother would I be if I didn't put my fear of carpet and rugs aside and try to help a shih tzu out? 

Then it just so happened to be that a beautiful rug was on sale at Tuesday Morning. I saw the ad while over at Nana's and I should know better then to point out things I like because the next week her and Aunt C were dropping off it in my living room. 

It's a 5x8 which runs the length of our current couch and is a nice chocolate brown base with teal and avocado green ikat pattern. 


I think it looks great with our makeshift coffee table (a trunk I snuck out of my aunt's garage).


I love how it pops against the wood floor but doesn't draw too much attention to itself like "Hey, I'm carpet! Come drop beer on me!" And by the way, in case you were wondering, Eddie lurves it. He can't stop posing with it. He naps with it. He eats treats on it. It's his soulmate. And yes as soon as we rolled it out, like even before we got it situated, he used it to help him get up on the couch and just looked at all of us like, "freaking, finally guys, you get it."

See him? He's camera shy but couldn't part with his new BFF.


Oh, and here's a close up of one of those free pillows a snagged from my cousin's wife. I'm apparently ok with mixing so many patterns, but know that these won't stay. We've thought that after the wedding we'll start saving for a new couch (sectional!) so there will be time for more intense thought on pillows later. 


Here's a shot of some coasters I scored from Pier1 for under $6. They are an embossed metal with a felt bottom. I like. 


The coasters came in their own holder/case thing that I guess really OCD people put their coasters back in when they are finished using it. Are you ever finished using a coaster? Do people take the time to do this? I don't, so anyways, I decided to take it to use on my nightstand as my ring/hair tie/chap stick holder instead. Two for one I say. 


So there you have it. The Rug Dr. came and fixed all of Ed's worries and ailments. I think the rug looks great and it's actually a nice break for our feet since we're not used to walking around on such hard flooring.