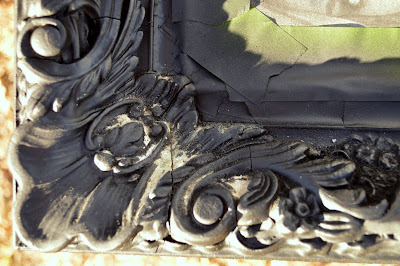
It all started with this *free* mirror my mom was given many years ago from a good family friend. My mom hung on to it for a while and it moved with her until it wound up in storage for a couple of years. Then when B and I got our first place she passed it along to us and I thought it would hang perfectly on one of the (two) blank walls in our dining room.
Some where along the way the beautiful mirror lost a chunk of itself in the corner, but no worries we found the wayward piece.
It was a simple three step process to reconnect the chunk to the rest of the mirror. I lightly sanded both the back of the chunk and the open spot on the mirror where the chunk met up with it. I applied a good amount of wooded glue to the mirror frame and fit the chunk back into place.
For good measure I clamped the piece onto the mirror and left it there over night to make sure once it was all hung and done that piece wouldn't come flying off in the middle of the night.
And then of course I wanted to spray paint it. I taped off the glass with newspaper and painters tape. If you look in the picture above you'll see a small border right inside the ornate edge of the mirror.
Well I wanted to keep just this small border the original color so when taping I strategically went over the boarder as well. It really wasn't that tedious - covering the entire mirror took no more then 20 minutes.
Then the first coat of Flat Black Valspar Paint + Primer spray paint went on. Black may seem drastic and not something I would normally go with but paired with the lightness of our all white frame wall just on the other side of the doorway I thought it would help make the dining room a room of its own.
Also black + wood table + metal chairs = yum.
My spray painting technique is pretty simple but if you do it wrong things could end icky. The key is to do multiple light, thin coats instead of fewer heavy gloppy ones. The paint only takes about 10ish minutes in between coats so it's not a bad wait time. Also if you're a sprayin' - that hand better be a swayin'. If you start to notice your paint is pooling up all glossy like then whoa buddy, slow your roll and back off. Layers, my friend, is the key.
The paint literally started to eat at-sand off-disintegrate parts of the mirror. By parts I mean literally only one side. Like I went to pick a piece of lint off (I wipe down all items before I spray paint to prevent painted lint from showing up) and the lint kept pulling out and beneath it was bare wood. Bare like the very base of the mirror wood. I took my fingernail and kind of dug at the crevices and more lint-paint-wood came with it.
See how it's balled up and hairy looking like lint? Well it wasn't because the mirror was not that dirty looking before and all of the other sides were just peachy. I ran my nail and finger across the other ends of the mirror and felt tacky spray paint just as expected. But the one side? Narnia.
Here's what that end looked like after I meticulously dug out all the mysterious substance and got down to the bare wood. Luckily, I just vacuumed it all out and applied another couple coats on that side and we had no problems after that. Strangest. Thing. Ever.
After the mirror cured for a couple of days and I waited for my mom (mirror hanging queen, btw) to stop by we got the beast up. Yes, beast, it probably weighs 60 pounds. We used two anchor-hook things and a nice strong wire and this sucker ain't going anywhere.
Sure for now the mirror doesn't reflect anything as of yet. But never fear I've got plans ya'll, big plans.


No comments:
Post a Comment