Tuesday, December 18, 2012

A Rustic Mantle

After taking the plunge and painting our brick fireplace back in October we were finally ready to tackle building and installing a mantle. I perused the interweb taking note of other off center fireplaces and how the mantle looked being different lengths, materials, height, etc to settle on our rustic wood design. I also found this helpful building plan that we followed roughly to get us along. 

We taped off a section 5 feet wide and about 2 feet from the top of the 'hole' to get an idea of placement. We decided to not run our mantle the entire (almost 8 feet!) width because we didn't want something that would cut off the fireplace from flowing with the ceiling and in hopes of creating a bit of balance to the off centered 'hole'. 


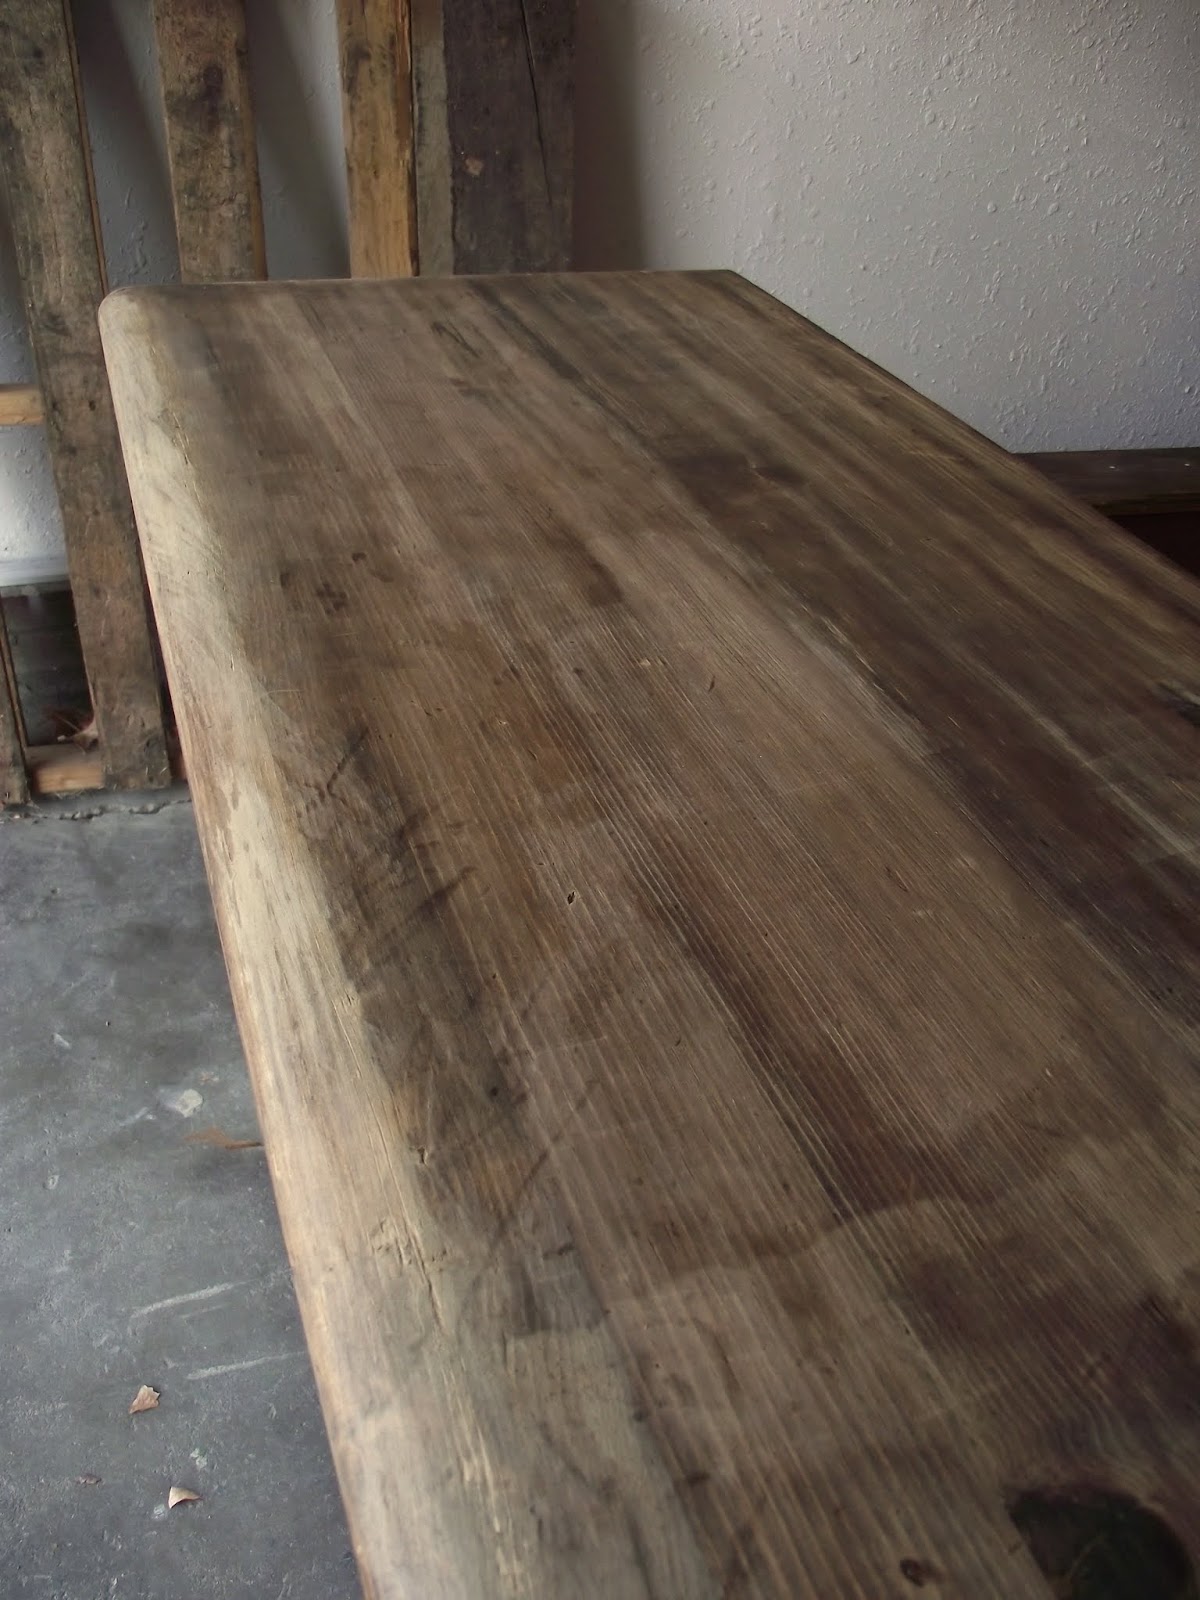
Then we purchased three 1x8 boards that were all 6 feet long. We would eventually trim them all to 5 feet and use two of those trim pieces for the ends of our hollow mantle. But first I needed to rough them up a bit. Frist I sanded all four edges down with 100 grit sandpaper to make the edges more round and less "new".


Then I used a bunch of the same techniques found in this video by Young House Love on how to make new wood look old. I also added in some techniques like hammering in the tip of a paint can opener.


Here are the stained results of some of those techniques. The curved shaped in the center is from banging a hammer, the dashes towards the right are from hammering the edge of a screw, the wisp line going off the top on the left is from dragging a paint can opener and all the little dings that are scattered are from banging a bag of screws.


Here's another detail shot: again some more screw hammering action as well as some effects from dragging a screw multiple times over the edge that you can see towards the top of the picture. Those darkest colored notches are the results that I got from hammering in the tip of a paint can opener - they are my favorite.


Of course you see those boards after I stained them. To get this finish I dipped a rag in water and wiped down one board at a time and let it soak in while I got my stain rag ready. Then I dipped in my stain rag and ran it along the board pretty quickly. I really only dipped 2 or 3 times and just kept wiping the entire board down so I could get a more soaked in look rather then a full coat of stain.

After all the boards were distressed, stained and assembled (you can get more how to directions from here) we finally were ready to get them up. Oh, and I forgot to mention that none of this would have even happened if B's dad hadn't come down to help. I did the distressing and staining but they assembled and hung (and rehung, haha). They put in two metal brakets that both had a 2x4 screwed to the top.

After a little reconfiguring to make sure we had everything level the guys had the mantle up after only two tries! And it was super sturdy! And it was level! Then of course came to accessorizing!


Since it is the holidays and hanging all my holiday decorations was the main reason why I fought for the mantle to get done so quickly I didn't slow down fast enough to snap a pic before the holiday deco got up. I took the avocado mirror that was originally in our entryway frame gallery to add some depth and color and kept the winter accessories that I had on the hearth. I also added a cute little banner that I made with leftover scrapbook paper and white paint and twine; it says "Happy Holidays".


Here is a shot of the edge. In the building plans we were going off of they cover their ends with stained veneer to get a more "finished" look, but I guess we are cheap prefer things "unfinished" because we kept it au natural.


And just because I love love love the finished distress and stain here is another shot with it paired next to the avocado mirror and crisp white brick.


And then finally to keep things real here is a shot of the whole shebang to try and give you perspective.  And sorry for the varying light tones in this shot but it's not the easiest to capture. I love that the mantle gives some cozy warmth to that end of the room and balances nicely with the built in bookcase. We still have tons of plans for this space so know we are in the middle confusing space in time. Oh and forgive the rando barstool that snuck it's way in - I was probably using it as a tripod since I still need one. 

Oh and yes that dark blob on the rug, that's ed. 


Thursday, December 13, 2012

Meet [Jimmy] Buffet

As we were updating our college/old apartment furniture we upgraded our low black particle board walmart tv stand to my mom's old sofa table. It worked for the most part since it was a much better height and had a drawer but since the entire back was open you could see all our cord junk and I hate that. So I've been eyeing the using-a-buffet-for-a-tv-stand trend for a while and I am sold. Thus began my hunt and boy these things aren't quite as easy to come by as I thought they would be. When it comes down to it you can't just go get any buffet. Some are too tall, some have small drawer space, some are too damaged and some were perfect because someone else had already redone them - but those were super expensive (like, over 400 dollars). 

So one day nana and I decided to stop in this antique mall right down the road and took a look around. The owners were great and helped us look around, but they're wasn't anything that caught my eye. So there we were walking back to the car and the owner ran out and called us back in. He had this hutch/buffet combo that was detachable that he was willing to sell just the bottom piece he wanted us to take a look at. The drawers were the perfect size, the height and width were good and it was solid (read - hella heavy) wood. The 100 buck price tag was the icing on the top. Here it is back home as dark and shiny and gloomy. My plans were to strip as much as I could and paint what I couldn't. We planned to take out the top two drawers and build a shelf to rest in it so we could slide in our consoles. In all there are the top two longer drawers, the bottom four drawers and a center door cubby area. 


Here is the top once I striped about 5-8 layers off of it. We thought to either re-stain it or paint it but we loved the look of the roughed up, uneven look of the wood once striped.


I initially started stripping the sides and drawer area but it got to be too tedious so I said to heck with it and primed it. Luckily we loved the look of a painted bottom with a wooden top.


Here are my tools that I used to for non-prime painting process. One quart of Valspar paint+primer, low odor, no VOC paint in a nice grey, a small foam roller and small foam brush. I went with foam because I hate brush strokes and foam is my new painting jam.


Here is [Jimmy] Buffet all finished! Yay! I did put a satin poly on the wooden top and ended doing two full coats of the paint. Oh, and we got knobs from Hobby Lobby when they were half off. Oh, and a metal basket we had sitting around the house fits perfectly in the old door cubby area and holds our couch blankets.


See how the xbox fits in perfectly with plenty of breathing room? Beautiful.


I did continue the color into the cubby once I realized I wouldn't be saving the door.


How about a nice shot of those glossy black knobs. Love.


Tuesday, December 11, 2012

Oh Two for You

We all know that having a good amount of oh two (o2) in the house is good for health and good breathing air so we've been meaning to add some plants to our indoor area for a while. My mom gave us a Christmas Cactus last year and I've yet to kill it (mega points for me because I just can't remember to water things to save their my life). Christmas Cactus only needs watering about once a week and it gives blooms in the late fall all the way though January. So I had my eye on getting a larger Christmas Cactus from Lowe's for a week or so. The other night we popped in to Lowe's and they were half off already marked down to clearance. So I picked up this guy for 5.99 along with a bigger pot because I didn't want to hang it. 


Since I'm keeping the plant inside and on the floor I wanted to provide some irrigation so my water wouldn't seep to the bottom so I tossed in a few large handfuls of small rocks.


Then I added some scoops of dirt making sure to sift through the clumps and set my plant inside in the center. I topped the whole thing off with a layer of sand. The pot is Allen Roth and is bamboo and in a really nice shade of mustard green(ish). We got a raised plastic tray to rest on the bottom and you can barely even see it.


Also on clearance was this neat little cactus grouping. Seeing a theme here? Cactus + easy maintenance = my jam. This grouping came in a nice white ceramic bowl and topped with rocks and was only 4.99.


I also finally got my hands on an orchid. These guys are also easy to please since they only need three ice cubes a week.


Aren't the colors on this guy just beautiful? I described him to my mom as a purple and white snow leopard. I think it suits him well.


Sunday, December 9, 2012

Oh, The Places We Will Go

We have this weird map, vintage, old school theme going on in our bedroom these days. I think it started when we moved the secretary from the bar area to take the place of my nightstand (which reminds me, I need to take a pic of that). #PicsOrItDidn'tHappen 

Anyways, I helped this theme along with my recent purchase of an old atlas map from a shop on Etsy. 


I then found a 16x20 frame from Hob Lob that was dinged and on clearance and got some cork board dry mounted in the frame department.


We hung our map frame up on my side in between the window and our wall mirror. Pardon the reflection of mess. It's an illusion.


Then I just pinned up the map on all four corners with some mapping pins I picked up at Office Depot.


Then, I placed a pin (in the general vicinity) of places B and I have traveled together. We have a pin (in the general vicinity) of Kansas City, MO and Chicago, IL and Tulsa, OK and Cancun, MX. Yeah we've been places. Ha, we will be adding more and more as the years come! Hopefully.


Saturday, December 8, 2012

....and Pillows Under the Tree

The weekend after Thanksgiving seems to be a good time for us to start decorating for the December Holidays even though it felt weird to be putting up reindeer and snowmen when it was over 70 degrees outside. Any who, I picked up these awesome reindeers at The Salvation Army for two bucks each. I of course snagged me a can of a nice grey glossy spray paint and gave them a makeover. 

Here they are hanging out. Playing reindeer games. Ha. 


And here they are all gussied up on our fireplace hearth. I lurve them. They hang out with our kidney bean vase and electric insulator. They get cozy thanks to the votive that I plopped into that has-been drinking glass. I found it, along with two others, at The Salvation Army for .99 cents a piece. Steal!


Here is another little holiday setting for ya. Poor lighting, it was dark, I'm sorry. We have some ikea basket vases, a vintage milk glass vase (flea market find for 2 bucks), salvation army drinking glass turned candle holder, a giant red ornament and my holiday star from Gordman's. Snazzy.


How cute is this votive holder? Less then 5 smacks at BBW. The candles burning are called Sparkling Icicles. I used to loath candles that had the name of something that doesn't have a smell. I have since had to fold in this emotion because all candles now smell like something that doesn't really exist. The sleigh was a Dollar Store find last year and is filled with red and white candy ornaments.

But seriously, what is Wedding Day supposed to smell like? Nervous sweat and cake?


The final .99 cent glass sits with this sweat geometric candle box holder thing from BBW that was around thirteen bucks, but was free because I had a sweet coupon. The candle burning in there is Chestnut & Clove. Now that, my friends, we know what smells like. Or you could at least find some chestnuts and cloves and smell them. You can't just go smelling a wedding.


The dining room table set up. The tray we got from B's mom, the vases and candles we've had and the hurricane in the back was a steal from TJ MAXX for 5 bucks. I filled it with a neutral vase filler from Target along with some small gold ornaments.


I plopped another jumbo red ornament here too to add some festive-ness.


And finally....the tree. We are still using my white tree that I've had from college. It kind of started to yellow this year so I see a new tree in our Holiday Future. This year we were able to add some sports ornaments that B's grandma has been collecting for him for the last 26 years (along with other themes). Next year I'd like to get our regular tree for regular ornaments and a table top real tree for the smell and so we can put ornaments that really mean something to us on them and maybe be able to mix it up every year.

And yes those are pillows under our tree.


I put pillows down there because I'm crazy to fill space. Luckily we don't have a lot of people to buy for these days, but that also means not a lot of presents get to hang out under the tree. Like right now we have two under there and I bet you couldn't even tell. It's like Where's Waldo over here. These pillows also usually hang out in the guest room so I don't get to see them that often, but for this month I can. It also allows me to showcase my wonderful bird collection (stop rolling your eyes). And yes, the two white ones in the back are salt and pepper shakers. No judging. Happy Holidays!