Thursday, February 28, 2013

Mirror, Mirror, on the Wall

It all started with this *free* mirror my mom was given many years ago from a good family friend. My mom hung on to it for a while and it moved with her until it wound up in storage for a couple of years. Then when B and I got our first place she passed it along to us and I thought it would hang perfectly on one of the (two) blank walls in our dining room. 


Some where along the way the beautiful mirror lost a chunk of itself in the corner, but no worries we found the wayward piece. 


It was a simple three step process to reconnect the chunk to the rest of the mirror. I lightly sanded both the back of the chunk and the open spot on the mirror where the chunk met up with it. I applied a good amount of wooded glue to the mirror frame and fit the chunk back into place. 


For good measure I clamped the piece onto the mirror and left it there over night to make sure once it was all hung and done that piece wouldn't come flying off in the middle of the night. 


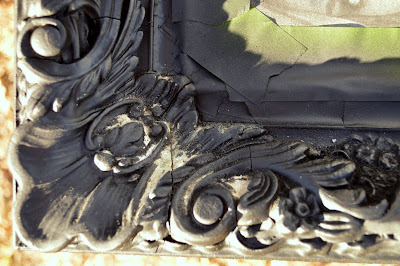
And then of course I wanted to spray paint it. I taped off the glass with newspaper and painters tape. If you look in the picture above you'll see a small border right inside the ornate edge of the mirror. 


Well I wanted to keep just this small border the original color so when taping I strategically went over the boarder as well. It really wasn't that tedious - covering the entire mirror took no more then 20 minutes.

Then the first coat of Flat Black Valspar Paint + Primer spray paint went on. Black may seem drastic and not something I would normally go with but paired with the lightness of our all white frame wall just on the other side of the doorway I thought it would help make the dining room a room of its own.

Also black + wood table + metal chairs = yum.

My spray painting technique is pretty simple but if you do it wrong things could end icky. The key is to do multiple light, thin coats instead of fewer heavy gloppy ones. The paint only takes about 10ish minutes in between coats so it's not a bad wait time. Also if you're a sprayin' - that hand better be a swayin'. If you start to notice your paint is pooling up all glossy like then whoa buddy, slow your roll and back off. Layers, my friend, is the key.


Third and final coat. I was all like yeah, buddy 30 minutes and I'm done. And then. The. Strangest. Thing. Ever. Happened.


The paint literally started to eat at-sand off-disintegrate parts of the mirror. By parts I mean literally only one side. Like I went to pick a piece of lint off (I wipe down all items before I spray paint to prevent painted lint from showing up) and the lint kept pulling out and beneath it was bare wood. Bare like the very base of the mirror wood. I took my fingernail and kind of dug at the crevices and more lint-paint-wood came with it. 


See how it's balled up and hairy looking like lint? Well it wasn't because the mirror was not that dirty looking before and all of the other sides were just peachy. I ran my nail and finger across the other ends of the mirror and felt tacky spray paint just as expected. But the one side? Narnia.


Here's what that end looked like after I meticulously dug out all the mysterious substance and got down to the bare wood. Luckily, I just vacuumed it all out and applied another couple coats on that side and we had no problems after that. Strangest. Thing. Ever.


After the mirror cured for a couple of days and I waited for my mom (mirror hanging queen, btw) to stop by we got the beast up. Yes, beast, it probably weighs 60 pounds. We used two anchor-hook things and a nice strong wire and this sucker ain't going anywhere.

Sure for now the mirror doesn't reflect anything as of yet. But never fear I've got plans ya'll, big plans.


Monday, February 25, 2013

Banners and Babies

For the past couple of months I've been working really hard at trying to get back into photography. Heck, my degree even focuses on photography so I think it's about time I pay attention to it. My dad got me my first set focus film camera way back in 1996 when I was just eight. From there I upgraded to various cameras over the years all from point and shoots to polaroids to fancy DSLR's. Currently I'm working with a Nikon D-3200 and I love love it. 

So anyways a small wall in our office has turned into a mini photo shoot area mainly for my second cousin Jett who is just reaching seven months old. So in order to spice up the area and bring in new themes and backgrounds I whipped up this little scrapbook banner last week. 

I bought the ready-to-decorate banner for 4.99 (with my 40% off coupon) and six sheets of scrapbook paper all at half off. All I needed to complete the project were scissors and a glue stick. To make the banner I simply traced the triangle on the scrapbook page (I was able to fit two triangles per page) then cut out the triangle and glued it onto the banner backing. 


The banner was something like 10 feet long so since I wanted a layered banner look I cut the banner to give me three sections of flags. Here is one set up I use with the banner against a white backdrop and a small basket with blanket just big enough for a squishy baby.


Here is the final setup we used with Jett. At six months he was just able to sit himself up even though he toppled over about every 10 frames, haha. But I think it's cute. It gives a nice color pop to the background and the bonus is the other side of the flags are still white so once I get a little girl baby to take pictures of then I can get new paper to accessorize the other side more fittingly.


Tuesday, February 12, 2013

Sheer Madness: The Real Winners

After living with our sheers-behind-the-shades setup for nine months I finally looked at our living room one day and decided what was missing. There had been something that just felt off about the space for a while because one of the main reasons we bought the house was for the lovely amount of light it brought in but lately it had been feeling dark and dingy. 

So on a trip up to Kansas City to see family I stopped into a TJ Maxx and fell in love with some curtains. I had dreamt up this 'thick sheer' with a subtle pattern that would be perfect for the space but expected it to take me forever to find the perfect one that didn't cost a million dollars. I was literally on the last aisle of the store (like rounding the end-cap) when these lovelies caught my eye. They were a thick sheer (sheer enough to let light in but thick enough to give privacy) and had a beautiful, but very subtle ikat-ish pattern to them. 


And the best part? They were massive sized panels 100"x84" and they came in a pack of two for 19.99. Hello, ten dolla curtains. I couldn't find fabric for that cheap per yard to make a panel this size let alone to make up for the time it would take me to hem them up. Glorious day. The kicker was that there were actually two colors that I loved in the store but couldn't decided on. This lovely grey blue with soft cream and dark grey accents. 


And this more tan/green/yellow shade with blue and brown accents. With the absolutely ridiculously huge windows we have in our living room I estimated that I would need ten total panels (6 for the picture window and 4 for the windows by the fireplace). So I threw 5 packs of each color in my cart and loitered in TJ Maxx while I pondered. I called everyone I knew and sent them pictures and tried my best to describe the color tones over the phone. I still couldn't decide.


So then I thought I'd throw together a small mood board right there in the store. I wanted to get an idea of how the other colors and tones in our living room would work each panel. So I found the closest grey to our walls in a sheet set, a white frame accent which we have scattered about and then I set everything on top of a dark walnut dresser that matches the tone in our floors. Still couldn't decide.


So after some advice I decided to to buy it all. I bought 5 packs of both colors and brought them home. I needed to see in person how the curtains played off our wall color and chairs and floors. As you can see below my very sophisticated method of envisioning the curtains in our space. I simply frog taped those babies up to the wall at about the height I would later hang the winners. I left them there for about two days while I was on the hunt for the equally massive curtain rods to hang them with.


Here is the winner! This is the panel I was most afraid of in the store and the one everyone via phone seemed to like the most. I didn't want it to be too 'seaside blue' or wash out the grey. But the tan panel in person washed everything out in a sea of the worst shade of 'grellow' you've ever seen.


And let me tell you these rods were the hardest thing in the world to find. I had high hopes of snagging some at Ross, Marshalls or TJ Maxx for a good deal but apparently stores like that don't sell rods that have to go up to 117 inches. So I eventually found some at Bed, Bath & Beyond where I used a 20% off coupon for each along with a left over giftcard and ended up paying 30 of our own dollars. Then I had to pick up rings from Target because I wanted the curtains to be hung pretty high so I needed the extra inch or two and I also wanted them to be really easy to open and shut.

Also remember the weird little ledge we have going on over the windows by the fireplace? Well it helped to disguise it when I caulked the deep crevices but it helped a ton by hanging the rod high enough over the ledge to kind of blend it in with the wall.


We also made sure to hang both rods at the same height regardless of the slight difference in the window height. This helps to trick the eye into thinking there are actually the same height and makes the room flow a lot better. Oh and the bestest part of all this? I ended up only needing six panels total (4 over the picture window and two by the fireplace). Since the sheers were thicker then normal sheers they worked great to give coverage with less.

End of story: we love them. It makes the space feel bigger and lets in more light. Win, win.


Friday, February 1, 2013

Dang Weather

For a while I've been wanting to copy what I see in a lot of inspiration rooms that have painted backs in their bookcases. We have this kind of odd-spot bookcase between our fireplace area and nook but the back of it is bead board like the walls. Once you put accessories in the bookcase the vertical lines kind of make it all too busy. So not only did I want to have a colored backed bookcase, but a smooth one. So I came up with this brillant idea of getting foam boards cut to size per shelf and adhere scrapbook paper to them. 

So off to Hob Lob we went with our shelf measurements and they did some slicing for us. Foam board was 30% off and scrapbook paper was 50% off so for the materials we needed for our funky placed bookcase and the cut out above our bar came up to just about $15 smacks. 


Once we got home I had high hopes of just being able to pop them into place. Yeah, well shelves were bowed and some were thicker than others so each foam board needed a little bit tweaking here and there. So my wonderful hubby would slide in the board and pencil mark where he needed to trim off a little.


We he got them all trimmed and I got them taped together and slide them in to their own shelf.


Then I took each foam board individually and sprayed acid free adhesive on the board then very carefully placed a scrapbook paper on. I repeated this process until the board was covered. I had to trim a couple spots down and use acid free double stick squares in some places in addition to the adhesive but it all seemed to turn out ok. I used double stick thick foam squares in each corner and in the center to help the foam board stick to the back of the shelf.


Once all the accessories were put back in the area looked great. I love the pop of color against the white trim and grey walls and our mostly neutral accessories. It kind of helps make the bookcase stand out a little more as it's own area instead of a wall cut out. The chair and lamp placement help it become it's own little room in the house and I love it. 


But in the keeping-it-real- category this project may be a big fat fail. I don't know if it's the weather or me (let's just say the weather) but the entire thing is falling apart. The foam board won't stick to the wall, the scrapbook pages flap at the corners and one just fell completely off today. I love the color. I love the contrast. I love that the bead board is hidden. But this just isn't the answer. You win some, you lose some. I'll keep mulling over how to fix it, until then I will stare at half fallen scrapbook pages.

Oh and a picture frame just up and jumped off our entryway wall gallery today and broke. Dang weather.